*This article contains some promotional material.
Filmora13の分割表示機能の使い方まとめ
In this article.Filmora13This section explains how to use the split display function of the
Filmorain order toFull 30-day money back guarantee from purchase.So, you can try it out risk-free.
If you actually try Filmora and don't like it, just send a simple "Please refund." via the contact form on the official website and you will receive a full refund.
Filmoraalso offers discount campaigns from time to time.For the latest discount information, link belowPlease check it out from the following page.
↓arrow (mark or symbol)
Click here for the official Filmora website
30-day money-back guarantee now!
TOC
Filmora13(フィモーラ13)の分割表示機能を使って表示する方法
Select [Split View] from the menu.
Select "Split View" from the menu.
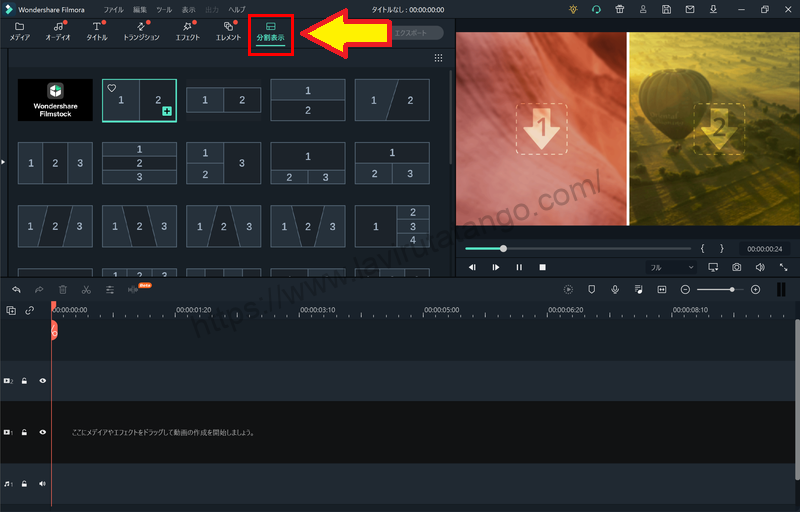

Select a split style from the menu [Split View].
Select the style of division from the menu [Split View].


Filmora offers about 30 different types, with various patterns in terms of the number of divisions and the way they are divided.


There are also patterns in the division of two screens, such as whether to divide vertically, horizontally, or diagonally.
In addition, you can choose from 3 to 6 screens as well as 2 screen splits.
Once you have decided on the material you want to use, drag and drop it onto the timeline.
Once you have decided on the material you want to use, drag and drop it onto the timeline.


The length of clips in the split view is set to 5 seconds by default. Adjust as needed.


Drag and drop the material you want to display in split view onto the preview window.
Drag and drop the material you want to split and display onto the preview window.


↓arrow (mark or symbol)
Click here for the official Filmora website
30-day money-back guarantee now!
Edit Split View
Enable split-screen animation


[Check the "Enable Animation in Split View" checkbox to add animation at the beginning and end of the clip.
Change border color and size


Video tab.[Border]The color and size of the border can be changed from
Advanced editing of split views


[Click on "Advanced Editing" for more detailed editing.


Please select the material you wish to edit here.
Processing and sound
[VIDEO ]You can process and edit the selected material from


[Audio]You can edit the audio of the selected material from the


[From "Color", you can select the color of the selected material.


Match the media duration in the split display to the timeline


You can change the length of the material individually here.
- The green band is the length of the material being divided and displayed.
- The length of the clip in the split display is up to the vertical dotted line.
By default, a still image (the last frame of the material) is displayed even in areas where the material is not placed.


[If you uncheck the "Match split view media duration to timeline" checkbox, nothing will be displayed where no material is placed.
↓arrow (mark or symbol)
Click here for the official Filmora website
30-day money-back guarantee now!
summary
In this article.Filmora13This section explained how to use the split display function of the
Filmorain order toFull 30-day money back guarantee from purchase.So, you can try it out risk-free.
If you actually try Filmora and don't like it, just send a simple "Please refund." via the contact form on the official website and you will receive a full refund.
Filmoraalso offers discount campaigns from time to time.For the latest discount information, link belowPlease check it out from the following page.
↓arrow (mark or symbol)
Click here for the official Filmora website
30-day money-back guarantee now!