*This article contains some promotional material.
Summary of how to do advanced color correction of videos in Filmora 13
In this article.Filmora13This section explains how to perform advanced color/tone correction of videos in
Filmorain order toFull 30-day money back guarantee from purchase.So, you can try it out risk-free.
If you actually try Filmora and don't like it, just send a simple "Please refund." via the contact form on the official website and you will receive a full refund.
Filmoraalso offers discount campaigns from time to time.For the latest discount information, link belowPlease check it out from the following page.
↓arrow (mark or symbol)
Click here for the official Filmora website
30-day money-back guarantee now!
TOC
Filmora13(フィモーラ13)で動画の高度色彩/色調補正をする方法
Select the video you want to color correct and pressAdd to the lower timeline view
Select the video you want to color correct and pressAdd to the lower timeline view.


Double-click on the image added to the timeline view
Double-click the image you added to the Timeline view.


Double-click on the image to open the media window.


Click the [Advanced Edit] button in the lower right corner of the media window
Click the "Advanced Editing" button in the lower right corner of the media window.


[Clicking on the "Advanced Edit" button willAdvanced Color Correction Windows will appear.


Click [Adjust
[Click "Adjust.


Advanced Color Correction
[For better color settings in the "Adjustment" tab, do the following


Each menu in this section has a checkbox next to it and all checkboxes are checked. If you only want to see a preview of the color settings you want to change in a clip, uncheck the items you do not want to edit.
Check the box again to restore the settings.
For any item, click the "Update" icon to restore the setting to its default.
white balance
In this section, you can adjust color temperature and hue to give your video a unique atmosphere.


Drag the [Color Temperature] slider backward or forward. Moving the slider backward will give colder colors (negative values), and moving it forward will give warmer colors (positive values).
Drag the [Hue] slider to apply different hues to the video.
3D LUT
LUTs (Look-Up Tables) are files that describe the processing method for replacing one color with another, and are widely used in the film industry.
The 3D LUTs available on Filmora bring Hollywood movies and TV shows to life.


Click the drop-down menu to display a list of 3D LUTs.
Additional 3D LUTs can be downloaded (from third party providers) and installed on your computer; to load them into Filmora, select "Load New LUT".
variety
In this section, you can easily adjust exposure, brightness, contrast, saturation, and vibrancy by dragging the sliders.
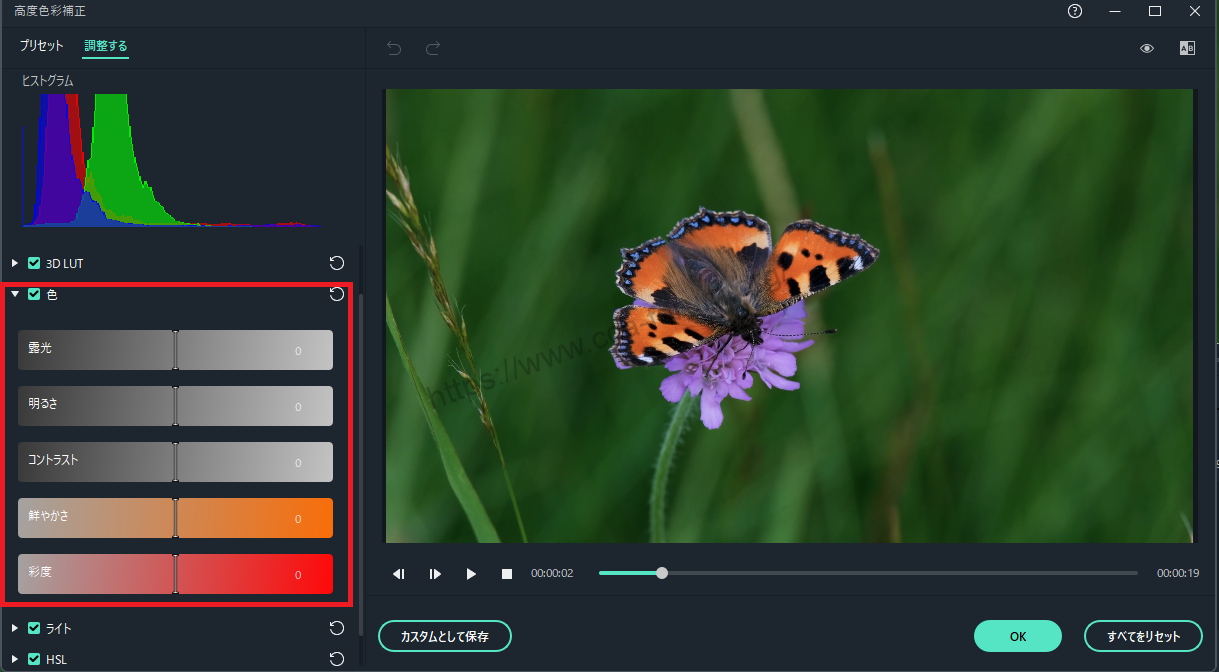

(photographic) exposure: Negative values darken all colors in the video, while positive values lighten all colors. Use this function when you want to correct an overexposed or underexposed image.
brightness: Brightens or darkens the video. Affects the highlights of the image, emphasizing brightness and darkness. Brightness affects all tones equally.
contrast: Adjusts the contrast between bright and dark areas of an image.
chroma: Moving the slider forward (to a positive value) increases the intensity of the image, while moving it backward (to a negative value) decreases the intensity of the image and produces a more grayish result.
vividness: Increases the intensity of color without changing the appropriate saturation color, but without making it stand out. Helps prevent skin tones from seeping in and overlapping unnaturally.
light
This panel allows you to adjust highlights, shadows, whites, and blacks to optimize the light on the video. Drag each slider left or right to adjust the image quality.


high-bit-rate digital subscriber line
HSL is short for Hue, Saturation, and Luminance. This section allows you to adjust individual color ranges within a video.
Select the color you want to adjust from the color panel and drag the Hue, Saturation, and Brightness sliders to adjust only the selected color in the video.


hue: Adjust the hue (lime green and teal) of a particular color in your video. For example, you can change the blue sky (all blue objects) to a color between cyan and purple.
chroma: Changes the vividness of colors. For example, you can change the faded colors of a blue sky to highly saturated and vivid blue sky colors.
luminance: Changes the brightness of the color range.
vignette


In this panel, you can drag the slider to apply the following custom vignette effects to your video
amount: Dragging the slider to the left makes the four corners of the video black, and dragging it to the right makes them white.
Size: Dragging the slider to the left increases the area affected by the vignette.
circular form: Drag the slider to the right to round the vignette color shape.
feather: Drag the slider to adjust the sharpness of the four corners of the vignette. Drag the slider to the right to make the corners sharper, and drag it to the right to make them sharper.
(photographic) exposure: Drag the slider to adjust the exposure of the video. This is the same setting as under Color Settings.
Highlights: Drag the slider to lighten or darken the blurring of the four corners of the vignette. If the feather setting is dragged to the right to eliminate the blurring, this setting effect will be lost.
Preview changes
[The Advanced Color Correction window allows you to compare the color-corrected video with the original video for review.
Click the [A/B] icon in the upper right corner of the window.


Click the [A/B] icon in the upper right corner of the window and select either [Side-by-side View] to compare the video before and after adjustment side-by-side, or [Split View - Left/Right] or [Split View - Top/Bottom] to see the video in half of the screen.
If you wish to make adjustments while viewing the original video for each position, click the "Show Originals" icon. If you leave it clicked, the original video will be displayed.
If you need to adjust again, click the "Redo" icon to the left of the preview.


Save as custom
If you want to use your custom color adjustments again, click "Save as Custom" below the video preview.


↓arrow (mark or symbol)
Click here for the official Filmora website
30-day money-back guarantee now!
summary
In this article.Filmora13explained how to do advanced color/tone correction of videos in
Filmorain order toFull 30-day money back guarantee from purchase.So, you can try it out risk-free.
If you actually try Filmora and don't like it, just send a simple "Please refund." via the contact form on the official website and you will receive a full refund.
Filmoraalso offers discount campaigns from time to time.For the latest discount information, link belowPlease check it out from the following page.
↓arrow (mark or symbol)
Click here for the official Filmora website
30-day money-back guarantee now!